HCCM-2100 - Heater Cable Control and Monitoring System
Installation Manual - Installation
Previous Section | Table Of Contents | Next Section
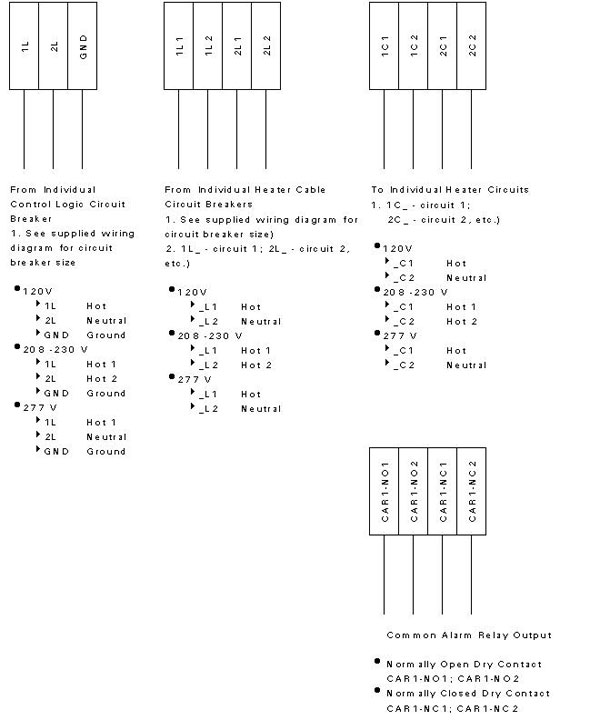
The following terminal block designations are standard on all HCCM-2100 systems. Also, refer to individual wiring diagram supplied with the panel.
Unpacking the Components
A typical HCCM-2100 consists of Remote Terminals and a Local Control Panel. Remote Terminals and Local Control Panel are shipped in individual cartons. The Local Control Panel includes Network Controller(s); Input/Output Module(s) for systems larger then four zones; and associated power switching relays and contactors. The Local Control Panel carton contains the panel itself, wiring diagram, and is identified by a specific project name and addressing markings. Inspect the shipping materials carefully for any signs of damage, and notify the shipping carrier if you find any signs of improper handling. Remove Local Control Panel and Remote Terminals from their packing and carefully inspect all of the components. Report any damage to the shipping carrier.Local Control Panel Installation
Install Local Control Panel on a wall using screws (see illustration below) rated for the weight indicated on the packing slip.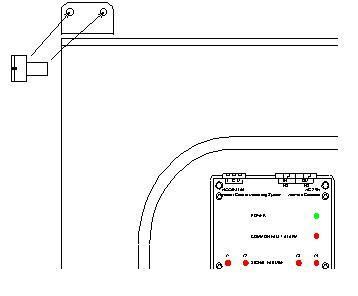
Wiring the Local Control Panel
Comply with the National Electrical Code and local code requirements.
Disconnect and lock out all power circuits before working on the panel.
Use bottom of the Local Control Panel to bring the conduits and wiring from circuit breaker power panel, and to individual heater circuits.
Local Control Panel Terminal Block
The following terminal block designations are standard on all HCCM-2100 systems. Also, refer to individual wiring diagram supplied with the panel.
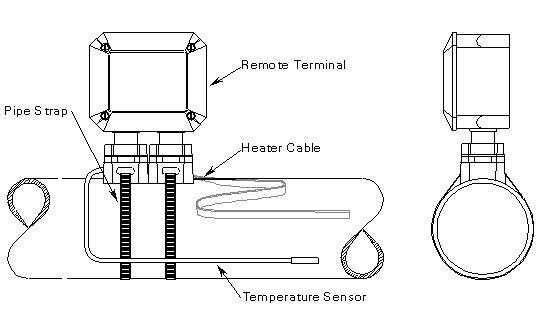
Remote Terminal Installation
Remote Terminals can be provided in a variety of enclosures. Installation detail below represents a typical mounting of a Remote Terminal. Remote Terminals are supplied with a three-foot length of a make and model heater cable used in the installation. Refer to the heater cable manufacturer instructions on heater cable splicing.
- Disconnect and lock out all power circuits before working on the Remote Terminals.
- Install Temperature Sensor on the lower part of the pipe, horizontally opposing the heater cable. Thoroughly clean a small spot on the pipe. Use heat conductive cement to affix the temperature sensor to the pipe.